
Struggling with false lashes that won’t stick or look obviously fake? You’re not alone. This guide is for makeup beginners and enthusiasts who want to achieve that seamless, natural-looking lash application without the frustration. We’ll cover the essential tools you need for perfect application, step-by-step techniques to secure your lashes properly, and simple troubleshooting tips for common problems like lifting corners and visible bands.
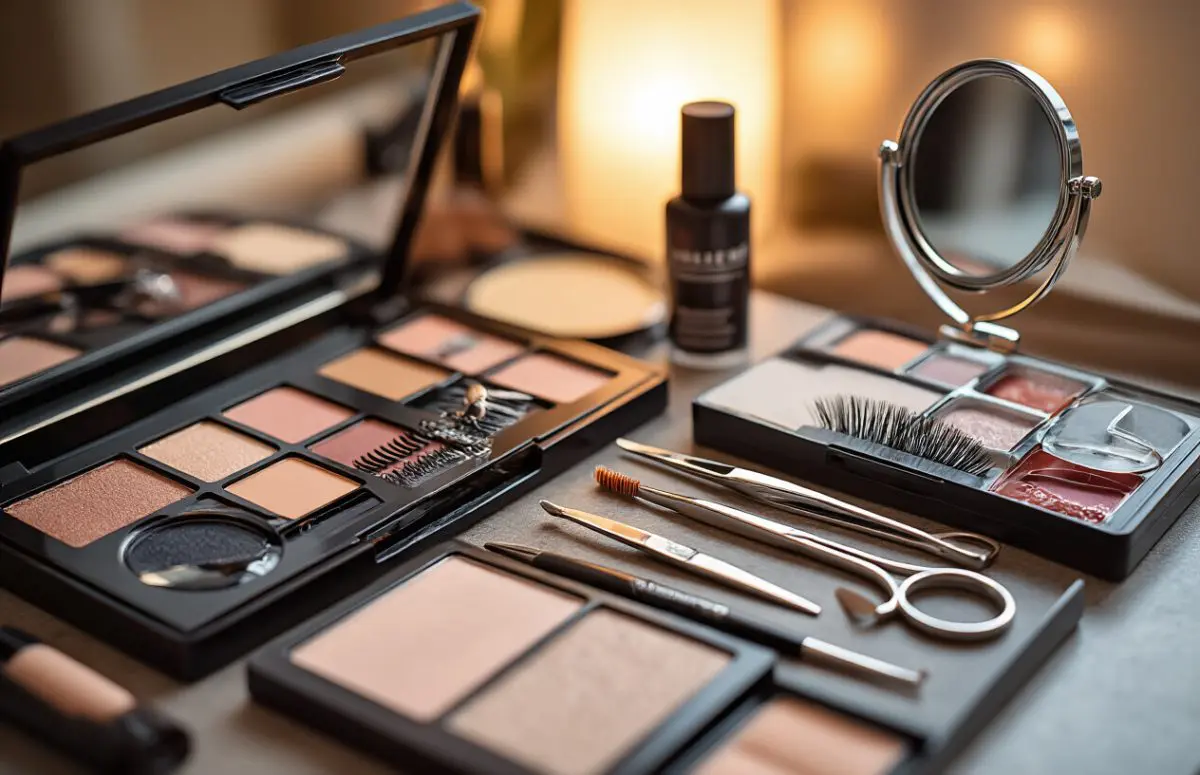
Essential Tools and Products for Perfect Lash Application
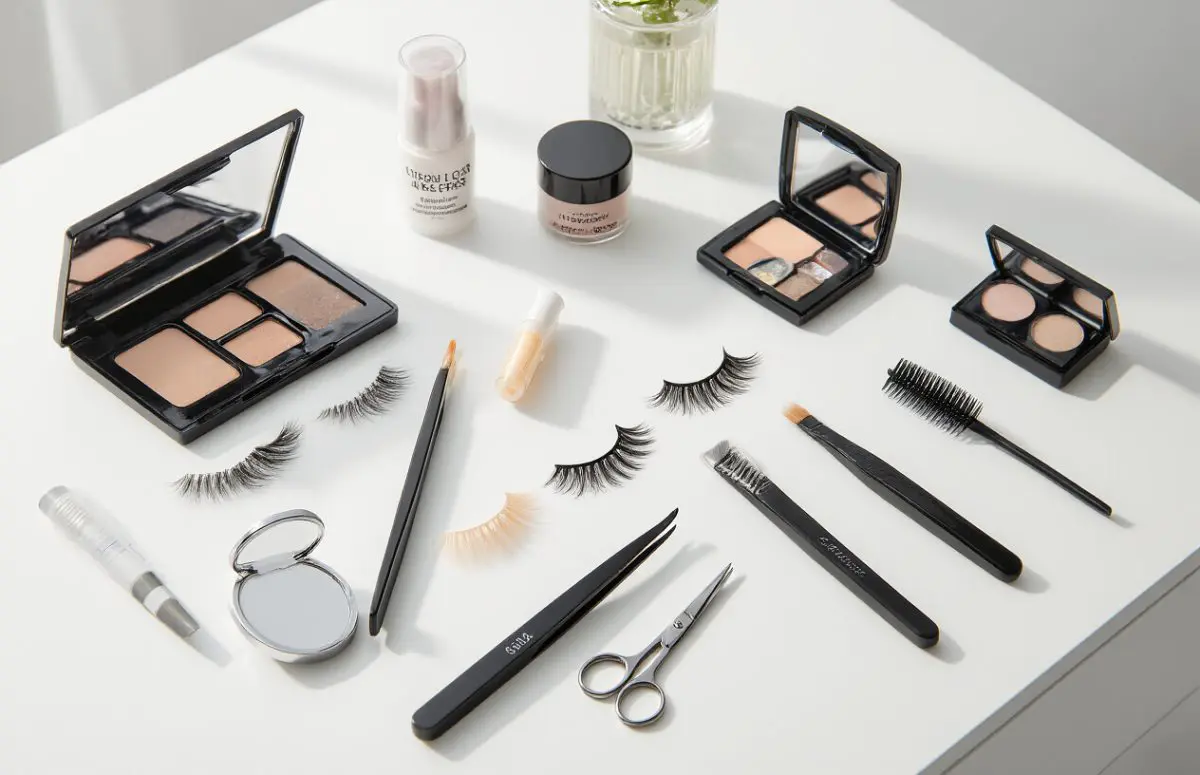
High-quality false lashes: strips vs. individuals
Look, choosing the right type of false lashes can make or break your whole look. I’ve tried both strips and individuals countless times, and here’s the real deal.
Strip lashes are your one-and-done option. Pop them on in one piece and you’re ready to go. Perfect for beginners or when you’re rushing out the door. They come in various styles – from natural-looking wisps to full-on dramatic volume. The downside? They can sometimes feel obvious or heavy, especially if you have smaller eyes.
Individual lashes? Total game-changers. They take more time (seriously, arm yourself with patience), but the customization is worth it. You can build exactly the look you want, focusing volume on outer corners or filling in sparse areas. They also feel lighter and more natural when applied correctly.
Pro tip: Keep a mix of both in your kit. Use strips for quick glam and individuals when you’ve got time to create something truly stunning.
Reliable lash glue options
Not all lash glues are created equal – I learned this the hard way after a mortifying “my lash is dangling from my eyelid” incident at a wedding.
Clear glue is fantastic for beginners because mistakes aren’t as noticeable. It dries invisible, so no telltale dark line if your application is a bit messy. Duo clear adhesive is my ride-or-die for everyday wear.
Dark glue creates that perfect liner-like effect that blends with your makeup. It’s ideal for dramatic looks or when you’re wearing heavy liner anyway. Just know that precision matters more here.
Latex-free options are absolute must-haves for anyone with sensitive eyes or allergies. Nothing ruins a look faster than red, itchy eyes.
Water-resistant formulas are non-negotiable for special events or emotional days. Regular glue won’t survive happy tears at your best friend’s wedding, trust me.
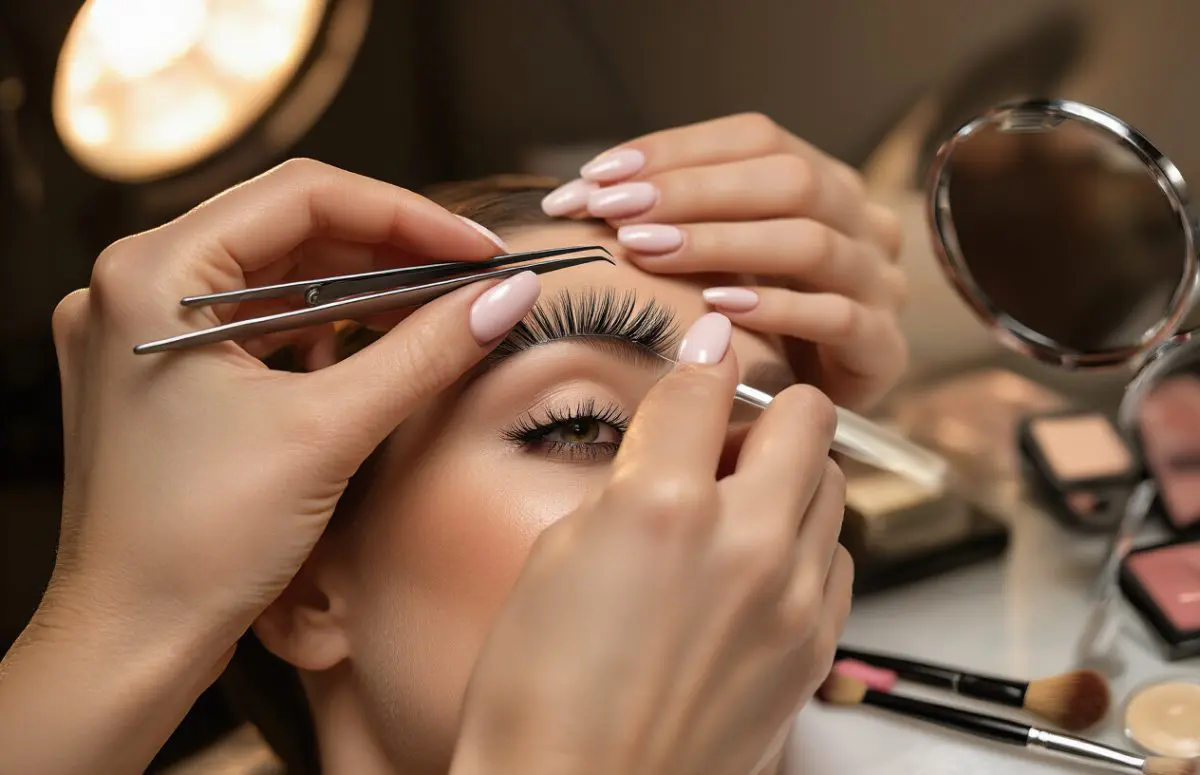
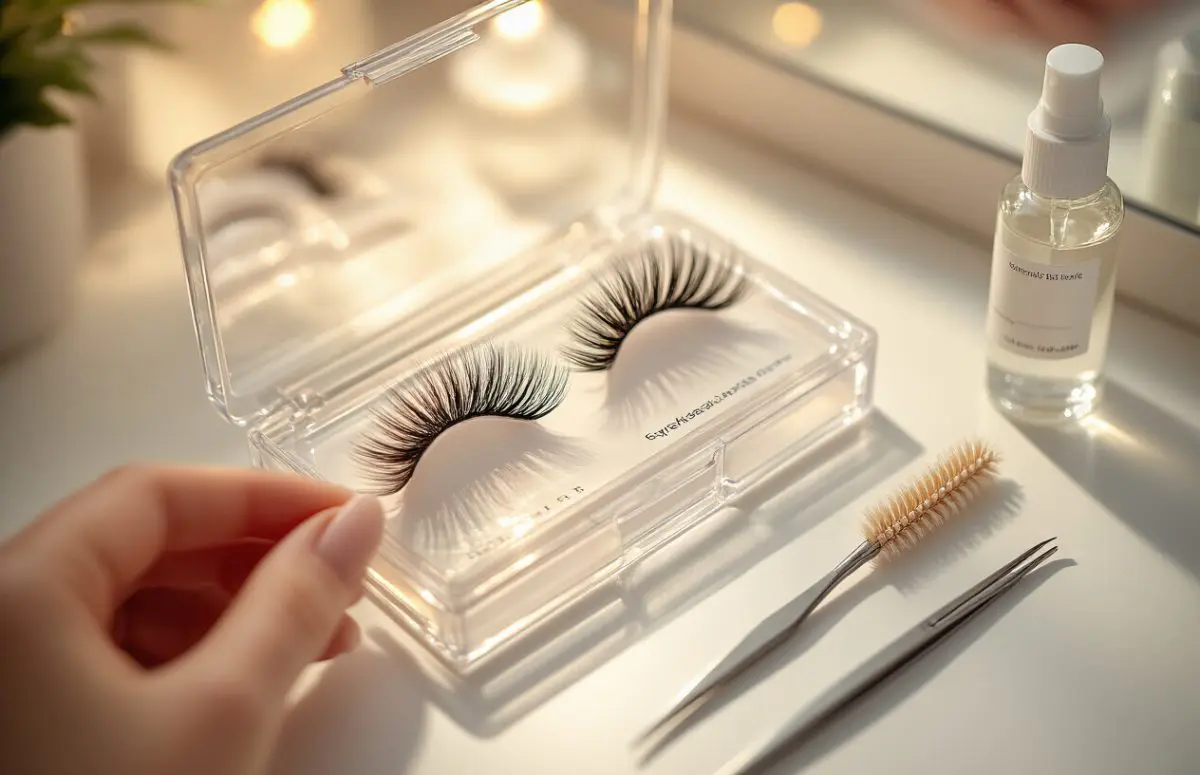
Precision tweezers and applicators
I’ve tried applying lashes with my fingers, and while it can work, proper tools elevate your game to professional levels.
Slant-tip tweezers give you the control needed to place individual lashes precisely where you want them. The angled design helps you get super close to your lash line without poking yourself in the eye.
Curved tweezers hug the natural shape of your eye, making strip lash application so much easier. They help you press the band down evenly across your lash line.
Dedicated lash applicators are worth every penny if you apply falsies regularly. They have special grips and curves designed specifically for lash placement.
Scissors for customizing lash length
Standard scissors won’t cut it (literally) when it comes to customizing your lashes. You need small, sharp scissors with precise tips.
Always trim your strip lashes from the outer edge – never the inner corner where the lashes are shorter and more delicate. Measure against your eye first, then snip conservatively. You can always cut more, but you can’t add back what you’ve already chopped off.
For individuals, trimming might be necessary if they’re too long for a natural look. Just a tiny snip can make all the difference between “obviously fake” and “wow, are those real?”
Preparation Steps for Flawless Application
A. Measuring and trimming lashes to fit your eye shape
Ever tried to wear false lashes that were way too long for your eyes? Yeah, not cute. They poke the inner corners, lift at the edges, and make you look like you’re trying too hard.
Here’s the fix: always measure before you apply.
Hold the lash band against your lash line and check if it extends beyond your natural lash line. If it does (and it probably will), grab some small scissors and trim from the outer edge. Seriously, don’t skip this step. Cut small bits at a time—you can always trim more, but you can’t undo a hack job.
Different eye shapes need different approaches:
| Eye Shape | Trimming Tip |
| Almond | Minimal trimming, focus on inner corner |
| Round | Trim outer edge to elongate |
| Hooded | Trim band to be slightly shorter than lash line |
| Monolid | Trim for a slightly cat-eye effect |
B. Curling natural lashes for better blending
Your natural lashes and falsies need to become BFFs, not awkward strangers. Curling your natural lashes creates the perfect foundation for your false ones to blend seamlessly.
Grab a good quality eyelash curler (not the cheap one that pinches), position it at the base of your lashes, and gently pulse three times while working your way outward. This creates a beautiful curl that matches the arc of most false lashes.
Pro tip: warm your curler with your blow dryer for 3 seconds before using. Just test it on your hand first—we’re trying to curl lashes, not burn eyelids.
C. Applying the right amount of mascara as a base
Contrary to what some people think, a light coat of mascara before applying falsies is actually helpful. It gives your false lashes something to grip onto and helps blend everything together.
The key word here is LIGHT. We’re talking one quick swipe, focusing on the roots. Heavy mascara creates clumps that make your false lashes sit weird and can cause them to detach sooner.
Black mascara works best because it disguises the band and creates a seamless look. If you have blonde lashes, this step is non-negotiable.
D. Creating the perfect canvas with eyeshadow
False lashes look most natural when they have something to blend into. A subtle eyeshadow base not only makes your lashes pop but also hides any mistakes.
Apply a neutral shade across your lid and a slightly darker shade in the crease. This creates dimension and helps mask the lash band. Bonus: if your lash application isn’t perfect (whose ever is?), a bit of dark shadow near the lash line can hide all evidence.
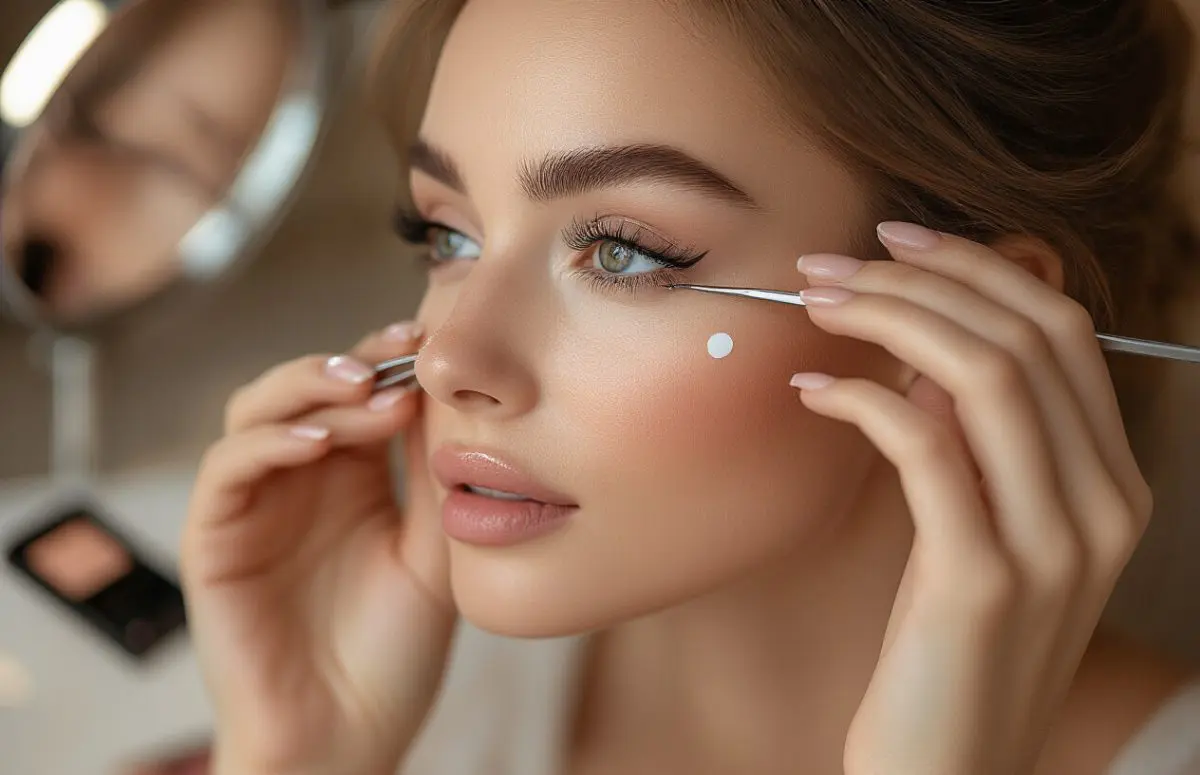
E. Testing lash placement before applying glue
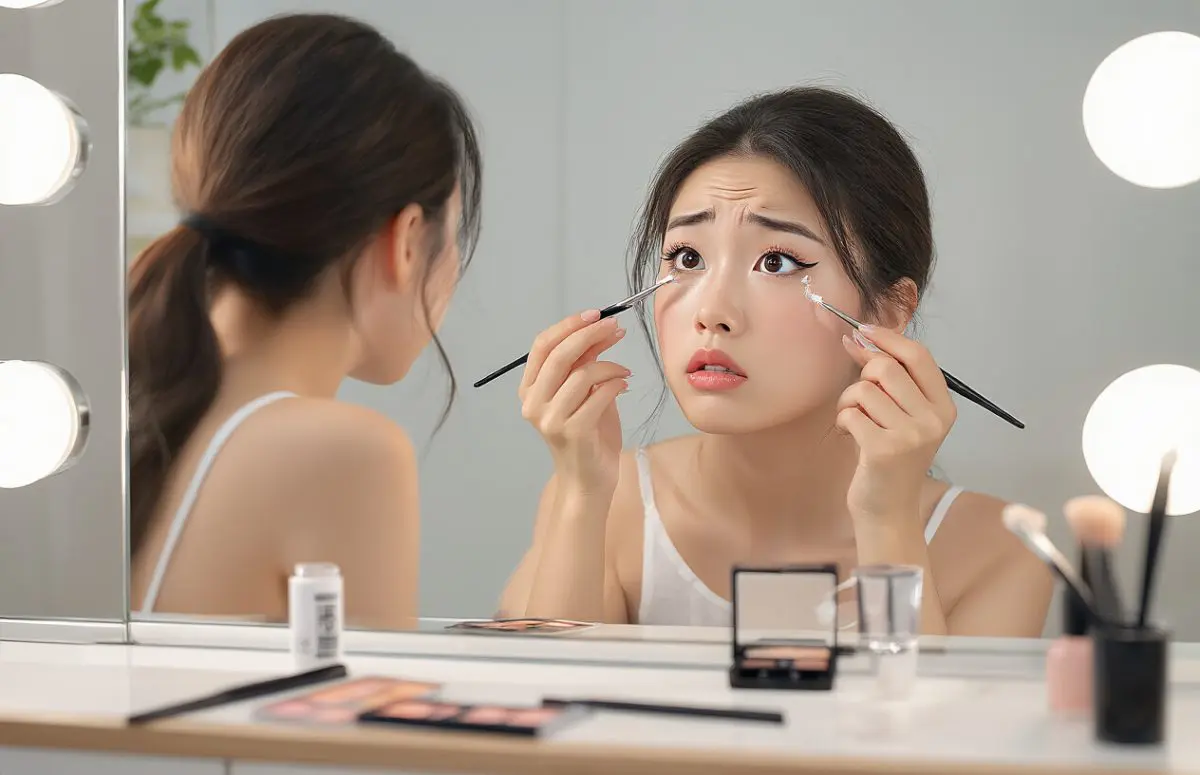
This five-second step saves so much frustration. Before adding any glue, hold the lash against your eye to check the fit and position. Look straight ahead in the mirror and place it just above your natural lash line—not on your lashes themselves.
Too many people rush and glue lashes wherever they first place them, then spend 10 minutes trying to adjust and reposition sticky, glue-covered lashes. Not fun.
Check that the inner corner doesn’t poke your eye and the outer edge extends just a tiny bit beyond your natural lashes for that sultry effect.
Mastering the Application Technique
A. The correct amount of glue to use
Let’s talk glue—too little and your lashes will peel off mid-dinner; too much and you’re dealing with a sticky mess. The secret? A thin line is all you need.
I’ve watched countless friends glob on lash glue like they’re frosting a cake. Don’t do that.
Here’s what works: Squeeze a tiny drop of adhesive onto the back of your hand or a clean surface. Then take a thin metal tool (the end of tweezers works perfectly) and run it through the glue. Apply that thin layer along the band of your false lashes. You want just enough to create a shiny line—nothing more.
For strip lashes, focus on applying slightly more at the corners. These spots tend to lift first, so a little extra insurance there goes a long way.
B. Proper drying time for optimal tackiness
Waiting is the hardest part, but it’s where most people go wrong.
You know that moment when you stick the lash on immediately and it slides around like it’s on an ice rink? That’s because you rushed it.
Most lash glues need 30-45 seconds to become tacky. Watch the adhesive—it should change from wet and clear to slightly cloudy. That’s your cue. If you’re using dark adhesive, wait until it darkens slightly and looks less shiny.
A good test: gently touch the glue with your fingertip. If it sticks slightly to your skin but doesn’t transfer completely, you’ve hit the sweet spot.
C. The placement sweet spot: where exactly to position lashes
Finding the right placement is like landing a plane—precision matters.
The strip should sit directly above your natural lash line, not on your actual lashes. I repeat: not ON your lashes, but just ABOVE them. When you place the strip on your natural lashes, you create an uncomfortable weight that pulls down your eyelids.
Start by positioning the strip so the inner corner aligns with where your natural lashes begin (not at the tear duct—that’s too far in). The outer edge should extend to where your natural lashes end or just a tiny bit beyond for a cat-eye effect.
D. The perfect angle for application
The angle of attack makes all the difference between amateur hour and pro results.
Most beginners make the mistake of coming at their eye straight on with the lashes held horizontally. This creates a gap nightmare.
Instead, hold the lashes from above and look down into a mirror. This gives you a clear view of your lash line. Apply from a downward angle, pressing the middle section down first, then securing the inner corner, and finally the outer edge.
When pressing the band into place, use the blunt end of your tweezers or a specialized lash applicator. Press directly onto the band, not the lash hairs themselves.
Securing and Blending Your False Lashes
Pressing and Holding Techniques for Secure Bonding
The most frustrating thing about false lashes? When they start lifting at the corners mid-event. Been there? Thought so.
The secret to keeping those falsies locked down is all in the press and hold. After placing your lash along your lash line, grab your trusty tweezers or a lash applicator tool and gently press the band down onto your eyelid. Hold it there for about 10 seconds. This isn’t just for show – this pressure helps the adhesive bond properly with your skin.
Focus extra attention on those stubborn corners. They’re usually the first to lift, so give them a bit more pressing time. I like to use the blunt end of my tweezers to really nestle the inner and outer corners into place.
Pro tip: Don’t rush this step. Your glue needs time to set. Many beginners slap on lashes and immediately blink wide, wondering why their lashes are hanging off by dinner time. Patience here pays off big time.
Eliminating Visible Gaps Between Natural and False Lashes
Nothing screams “amateur lash job” like that obvious gap between your natural lashes and falsies. You know the one – that weird space that catches light and ruins your whole eye look.
To blend them seamlessly, position your false lashes as close to your natural lash line as possible without actually sticking them to your natural lashes. Sounds tricky? It is at first, but practice makes perfect.
After application, pinch your natural lashes and the falsies together gently using your fingers. This creates a unified look that tricks the eye.
The game-changer here is mascara. Once your glue is completely dry (and I mean bone dry – give it at least 5 minutes), take a small amount of mascara on a clean wand and lightly coat where your natural lashes meet the falsies. This creates a perfect bridge between the two.
For stubborn gaps, try this trick: use a cotton swab to apply a tiny dot of dark eyeshadow right into the gap. It’s like magic – the shadow fills the space and creates the illusion of fullness.
Applying Liner to Disguise the Lash Band
Even the most expensive false lashes can have obvious bands. The fix? Eyeliner is your best friend here.
Wait until your lash adhesive is completely dry before applying liner. Using a liquid or gel liner with a fine-tip brush, trace along your upper lash line, making sure to fill in any visible spaces between the band and your eyelid.
Black liner works for most looks, but don’t be afraid to match your liner to your lash band color for a more natural effect. Using brown liner with brown-band lashes can look incredibly natural for daytime wear.
For a seriously undetectable finish, tight-line your upper waterline. This eliminates any flesh-toned gaps that might be visible between your lashes, creating the illusion that your falsies are growing right out of your lash line.
Don’t forget to extend your liner slightly beyond where your false lashes end. This helps blend the end of the lash band into your makeup look and prevents that obvious stopping point that screams “fake lashes!”
Troubleshooting Common Lash Problems
A. Fixing lifting corners
Ever apply those gorgeous lashes only to have the inner or outer corners pop up an hour later? So frustrating! The corners lifting is probably the most common lash fail, but it’s super easy to fix.
First, make sure you’re measuring correctly. Lashes that are too long for your eye will always lift at the corners. Trim from the outer edge if needed, and don’t be shy about cutting them down.
When applying, focus extra attention on securing those stubborn corners. A neat trick is to let the glue get a bit tackier (about 30 seconds instead of 15) before applying. This creates a stronger initial bond.
Still lifting? Try this pro move: use a toothpick to apply a tiny dot of additional glue right to the lifting corner, then press it down gently with your fingertip or a lash applicator.
B. Dealing with uncomfortable application
If your lashes feel like tiny torture devices, something’s definitely wrong. Comfort is non-negotiable!
The band might be too thick or rigid. Look for lashes with thin, flexible bands that contour to your eye shape. Some brands make “invisible bands” specifically for comfort.
Read more : Women Street Style: Effortless Street Styles from Paris to New York
Another comfort killer? Placing lashes too close to your inner corner. This area is super sensitive, so keep the lash starting about 2mm away from the inner corner of your eye.
Got itchy, irritated eyes? The glue could be the culprit. Try a hypoallergenic formula, and always let it dry to a tacky state before application to minimize fumes getting in your eyes.
C. Adjusting crooked placement
Nothing screams “amateur” like crooked lashes. But even pros get it wrong sometimes.
If you’ve just applied them and they’re sitting wonky, don’t panic! While the glue is still slightly wet, use your fingers or tweezers to gently adjust. The sweet spot is waiting about 30 seconds after application – the glue is set enough to move the lash as one piece but not so dry that it’s stuck forever.
For a professional tip: look down into a mirror during application. This angle gives you the best view of your lash line and helps prevent crooked placement from the start.
D. Managing excess glue issues
We’ve all been there – squeezing out way too much glue in our eagerness to make those lashes stick. But excess glue is a mess waiting to happen.
The perfect amount of glue looks like a thin line along the band – think eyeliner thin, not frosting thick. If you’ve gone overboard, quickly wipe the excess off with a cotton swab before applying.
Already applied and seeing glue blobs? Wait until completely dry, then use tweezers to gently peel away the excess. For stubborn spots, dip a clean spoolie brush in makeup remover and carefully brush away the dried glue.
E. Removing and reapplying without damage
Yanking off your falsies? Big mistake! You’ll damage both the lashes and your natural ones.
To remove properly, saturate a cotton pad with oil-based makeup remover and hold it against your closed eye for 30 seconds. This dissolves the glue bonds. Then, starting from the outer corner, gently peel the lash away.
Want to reuse them? Clean them immediately after removal. Use tweezers to gently peel away any dried glue from the band. For stubborn residue, dip a cotton swab in makeup remover and carefully clean the band.
Store them properly in their original case to maintain their curve and prevent dust buildup. With proper care, quality lashes can be reused up to 20 times!
Extending the Life of Your False Lashes
Proper removal techniques to preserve lash shape
False lashes aren’t cheap, so why treat them like one-wear wonders? Taking them off correctly makes all the difference between “one-night stand” and “long-term relationship” with your falsies.
First rule of lash club: never, ever rip them off. I’ve seen too many beauty lovers yank their lashes off at the end of the night and then wonder why they look like they’ve been through a windstorm the next day.
Grab a cotton pad and soak it with an oil-based makeup remover. Press it gently against your lash line for about 30 seconds. This breaks down the glue without you having to tug and pull. The adhesive will loosen, and you can slide the lashes off with your fingertips, starting from the outer corner.
Still stuck? Don’t force it. Add more remover and give it another minute. Your natural lashes and the shape of your falsies will thank you.
Cleaning methods for reusable lashes
Those gorgeous falsies can collect makeup, glue, and oils faster than your Instagram collects likes. Clean them after every use and they’ll reward you with weeks (sometimes months) of flutter.
Here’s my fail-proof cleaning routine:
- Fill a small dish with warm water and add a drop of gentle shampoo
- Swish the lashes gently in the solution for about 30 seconds
- For stubborn glue, use tweezers to carefully peel it off the band
- Rinse under lukewarm water until all soap is gone
- Pat (don’t rub!) with a clean tissue
For mink or other premium lashes, skip the soap altogether. Just use a cotton swab dipped in makeup remover and gently swipe along the band.
Pro tip: Got mascara on your falsies? Don’t panic. Use a clean spoolie brush dipped in makeup remover and comb through them gently.
Storage solutions to maintain lash curl and shape
Ever opened your makeup bag to find your favorite falsies looking like they’ve been trampled by a herd of elephants? Storage matters, people.
The original packaging works in a pinch, but let’s be real—those plastic trays don’t last. Invest in a proper lash case. They’re cheap, compact, and specifically designed to cradle your lashes in the exact shape they should maintain.
No case? Try this: wrap the band around a clean mascara wand or pencil for a few hours after cleaning. This helps them keep their curved shape.
Store them somewhere cool and dry. Bathroom steam is the enemy of lash longevity. The humidity makes the fibers droop faster than your energy after a 12-hour workday.
And please, for the love of all things beauty, don’t stack heavy items on top of your lashes. They’re delicate little butterflies that need protection, not pressure.
With proper removal, cleaning, and storage, those $20 lashes can easily give you 15+ wears. That’s basically pennies per batting of your fabulous eyes.
Achieving that professional false lash look is within your reach with the right tools, preparation, and technique. By investing in quality lashes and adhesive, properly measuring and trimming to fit your eye shape, and mastering the application method, you’ll create a seamless, natural-looking enhancement to your eyes. Remember that securing and blending your lashes with your natural ones is crucial for that flawless finish.
Don’t be discouraged by initial challenges – even professionals face lash application issues occasionally. With practice and patience, you’ll overcome common problems like lifting corners or uncomfortable placement. Proper care of your false lashes will extend their lifespan, making your investment worthwhile. Now that you’re armed with these professional secrets, it’s time to practice and perfect your lash game!